

Last updated August 1, 2026. By Andrew M. Tan.
So, you want to paint yellow. And, I mean bright yellow. Yellow is one of the hardest colors to paint on a miniature. In general, acrylic yellows have weak coverage and can come out splotchy or uneven.
In my experience painting Warhammer 40k Imperial Fists—the yellow Space Marines—I’ve found a simple way to speed up the process and get results I’m happy with. It starts with a light primer, Citadel Iyanden Yellow Contrast paint, and some dry brushing. Check it out below!
In this article, I share how I quickly paint my Imperial Fist Space Marines for the Warhammer 40k universe.

Why is painting yellow hard?
When I first started painting my 40k space marine army, I wanted them to stand out on the tabletop. That meant the brightest, impactful color in the rainbow.
Yellow.
Geez. Was I in for a shock!
Little did I know how hard this color would be to paint.
My first attempts at painting yellow resulted in splotchy, uneven coats. The yellow model paint never covered the primed surface well. Forget priming with black (my favorite color to prime with, by the way).
READ MORE: BEST PRIMERS FOR MINIATURES
At the time, I also tried the fancy Citadel Shades I had around, including Lamenters Yellow, which is now discontinued, and Casandora Yellow. Both helped me get that first yellow base coat over a white-primed model.
But, how do you shade yellow miniatures? I mean, seriously, shading yellow sucked because I was never sure what counted as a “darker version of yellow.” Orange? Brown?
When you mix yellow with orange or brown, you still get… well, orange and brown!
So, yes, I agree with you. Shading yellow on miniatures is hard. You still need contrast for a miniature to look good on the tabletop or in a display case. That “pop” comes from darker recesses and brighter raised surfaces.
Why yellow can be hard to paint
- Yellow model paint coverage is unreliable
- Hobby model paints with yellow pigment often and easily separate in the bottle or pot (trick: try using a shaker).
- Yellow shades or washes are quick and easy to use, but are hard to shade (e.g., create shadow)
- It’s hard to add contrast to miniatures with yellow as the main color
- Most other colors you mix with yellow overwhelm the yellow hue and you lose the “yellow-ness” of your paint (trick: mix neutral, unsaturated colors, such as whites or grays)
Airbrushing yellow can make the job easier
You can solve many of the issues with painting yellow by airbrushing (see this guide for airbrushing miniatures).
The airbrush allows you to apply even, thin coats over an entire model quickly. If you mix your yellow paint to the right consistency for airbrush use, the color becomes much easier to manage.
Of course, first you need to have an airbrush and know how to use it.

And, then you’ll still have to figure out how to shade your yellow base coat once you’ve airbrushed it on your model. Problems, problems…

As a commissioned miniature painter, I’ve had to learn how to paint fast while still maintaining quality. The airbrush has been an indispensable tool in my mini painting arsenal. In fact, I’ve spent hundreds of dollars on many airbrushes and accessories over the years. And so I know how finicky airbrushes can be.
Not everyone has an airbrush or wants one. I still love the feeling and control of a regular brush paint job. See how brush painting compares with an airbrush.
Ultimately, I prefer a regular brush most of the time. Yellow across a large model is still easier with an airbrush (see this 3D printed Imperial Fist Assault Tank paint job), and I feel more accomplished when I finish a miniature with a regular brush.
As a result, I wrote this article to show you how I now approach painting yellow across my Imperial Fist Space Marine army.
Yes, you guessed right. I now use Citadel Contrast paint as a main tool for painting yellow. Check out my Citadel Contrast paint review.
How I Paint Yellow Imperial Fist Space Marines
7 easy steps to paint yellow miniatures
- Prime white or light gray
- Apply a single coat of Iyanden Yellow Citadel Contrast paint
- Let your yellow base coat dry completely
- Dry brush with a complementary yellow paint
- Add highlights with dry brushing
- Add accent colors
- Finalize details
1. Prime white or light gray
I use Vallejo Surface Primer for most priming work. It’s easy to apply with a regular brush or airbrush.
For best results, I recommend spraying your primer.

For this project, I used an airbrush to coat my models with gray Vallejo surface primer in a spray booth.
MORE: POPULAR SPRAY BOOTHS FOR AIRBRUSHING TABLETOP MINIATURES
What you’re looking for in your first coat of primer is a very smooth surface. The smoother the early priming layers, the easier it will be to paint the rest of the model. Remove mold lines and keep bubbles out of the primer. Yellow is already flaky and unreliable. A poor primer foundation only adds to the trouble.
Spend the time to prepare your models for paint and save a lot of time later.
2. Apply a single coat of Iyanden Yellow Citadel Contrast paint
For most of my Imperial Fist army, I used regular acrylic model paints. Then, I discovered Citadel Contrast paints, which sped up the base-coating process.

For this project, I used Iyanden Yellow, the bright yellow I wanted for fast base coating. There is a darker yellow in the Citadel Contrast line, such as Nazdreg Yellow. I wanted a standard studio Imperial Fist yellow, which is basically school-bus bright yellow.

As you’ll see in the images, I simply took an inexpensive synthetic brush and applied a heavy undiluted coat of the contrast paint over the model.
If you want to see how some other yellows stack up, I compared five yellow paints for miniatures here.
One of the reasons I enjoy base coating is how simple it is. I feel no pressure to get it “perfect”.
You can work quickly.
No need to worry about your first color spilling into another area of a model. Simply cover your model in a coat of paint as evenly and smoothly as possible.

Sure, as I’ve mentioned, normally yellow paint is difficult to work with because your first coat doesn’t do the job of providing good coverage.
But, I suppose now I’m relying on a newer product… As you can see with Citadel Contrast paint, it speeds up the first base coat process because I can apply it straight from the pot.
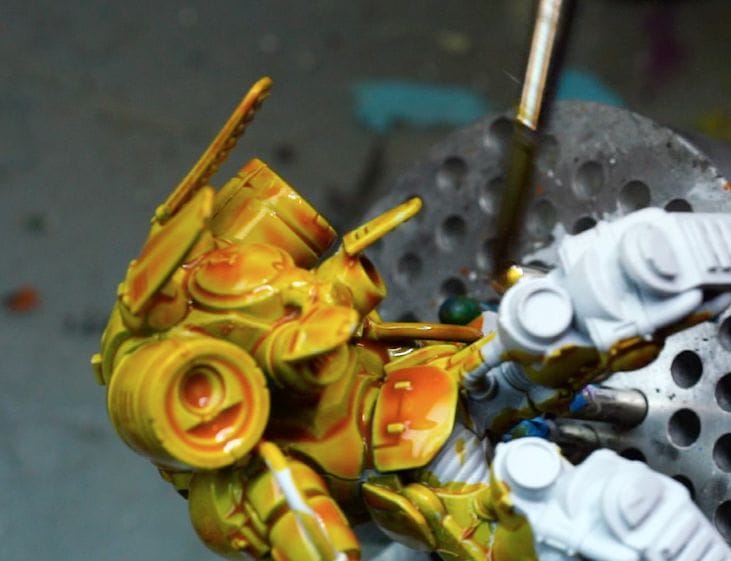
Of course, as an alternative to using Citadel Contrast paint, you can wash your model in a bright yellow ink. Then, wash it again with a shading ink or wash like orange or brown. But, then you’ll be adding more steps to your project.
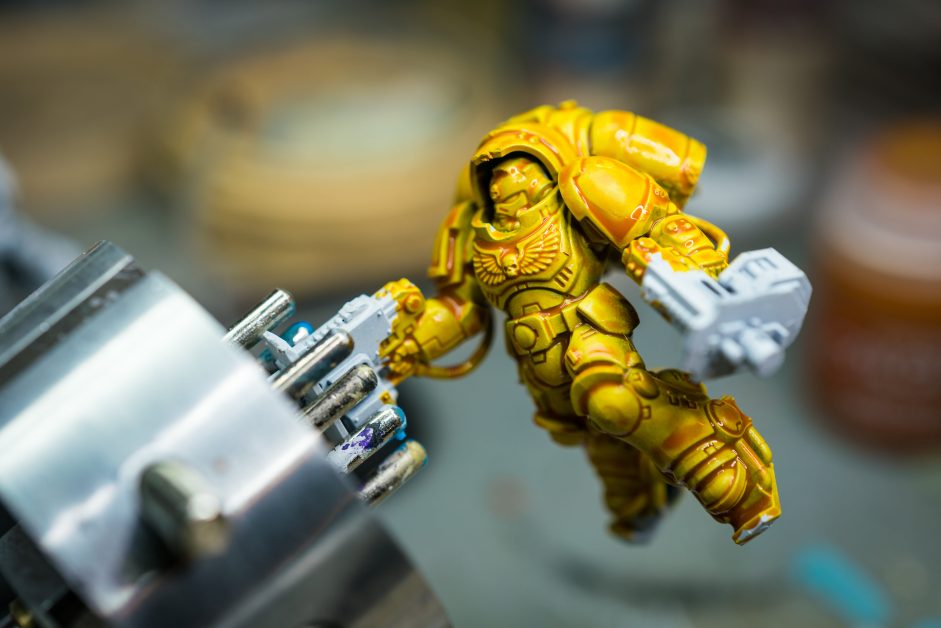
With Citadel Contrast paint, you can work faster. If you’re speed painting, Contrast paint can help. For a finish above tabletop quality, you’ll need more work after the Contrast coat dries.

I love how a single coat of this yellow Contrast paint slowly settles into the surface of the model.

Close up photos show how nicely the recesses darken with Contrast Color paint. There are drawbacks, of course. Some of the raised surfaces end up being splotchy and uneven.
A little Contrast Medium gives you more control if the paint is pooling. I stick with the medium here because it keeps the paint behaving the way I expect.
To save time, I didn’t add any thinner to my Contrast paint. One thick coat was all I did.
3. Let your yellow base coat dry completely
The reason you want to let your first base coat dry is to make sure you have an even coat of paint.
If you missed a spot, you’ll notice some underlying primer peeking through.
Now, as you’ve noticed that some of the surfaces on your model are splotchy where the Yellow Contrast Paint has pooled on the open, flat surfaces. On a space marine, this may mean you have uneven coverage (darkened spots) on the shoulder pauldrons, or along the leg armor plates.
4. Dry brush with a complementary yellow paint

To fix uneven open surfaces, I take a regular model paint with a similar yellow color as my base coat paint and prepare to dry brush. In this case, the closest color to the base coat Iyanden Yellow is Citadel Yriel Yellow.
Using the dry-brushing technique, shown here in depth, I apply an even layer of Yriel Yellow over the entire model to smooth out the splotchy base coat on the raised, open surfaces.


Dry brushing highlights the raised surfaces. The deeper recesses stay dark. That value range gives the model its “pop.”

Looking at all angles of your model, make sure your dry brush covers only the raised surfaces of your miniature. This is the key thing you want to do when you’re looking to add that “extra dimension” to your miniature.
5. Add highlights with dry brushing
If you want to push your highlights to a brighter value, you can add brighter paints to mix with your yellow.
Contrast is what makes a model stand out on the tabletop!
For this model, I added a bit of Creamy Ivory Reaper paint to my Yriel Yellow dry brush.

When I’m painting miniatures, I pause now and then to make sure the work is still moving in the direction I originally planned.

For me, I’m looking for a decent tabletop-quality paint job. Citadel Contrast paint and a good dry brush—two or three layers to even the raised surfaces and add highlights—are all I need.
Congratulations!

When I’m painting miniatures, I pause now and then to make sure the work is still moving in the direction I originally planned.
For me, I’m looking for a decent tabletop-quality paint job. Citadel Contrast paint and a good dry brush—two or three layers to even the raised surfaces and add highlights—are all I need.
6. Add accent colors
To finish the model, I know I want certain parts to be “black”.
For example, on this Imperial Fist Inceptor, I want the assault bolters, eagle, and armor joints to be dark gray or nearly black.
For speed, I plan to use Black Templar (another Citadel Contrast paint).
However, before I do this, I paint the areas I want to paint black with more gray Vallejo Surface Primer. This gives me a clean, bright surface to work on with the contrast paint, which is partly transparent. I don’t want to contaminate my black paint with a yellow hue (if that’s even possible).

Once I finish applying this smooth, bright surface, I’m ready for the Black Templar Contrast paint application.
Now, be careful.
Don’t get any new paint on your finished yellow paint job.
You’ve worked so hard to get your highlights and dry-brushing coat done that going back over it would be difficult.

My tip here would be to apply your next coat of Contrast paint with a small pointed round brush (like a #0 or #1 size) that has stiff bristles. This will give you more control in smaller places on your model. You’ll reduce the risk of putting paint somewhere you don’t want it.

When you’re finished, remember to let that first coat of black contrast color paint dry, completely. Be patient.
As with the yellow base coat, follow the same basic steps.
Dry brush a similar black color over the first base coat. In this case, I didn’t mind the splotchiness.
To highlight your black, simply find a brighter gray paint and dry brush that over the raised surfaces. See my photos for what this looks like.
Again, if you missed it, I wrote up a detailed how-to dry-brush article.
Or, you can check out my quick video on YouTube about how I dry brush.

7. Finalize details
If you’re a miniature tabletop painter, then you already know that details count.
Hardcore wargamers may let a few details go. I get it.

For myself, even if I’m aiming for a tabletop ready paint job, I need some semblance of completion in the form of a few details.
This includes adding those purity seals, eyes/visors, and a decal or two.

I don’t use complicated techniques for any of this. You need a steady hand, a few simple colors (one or two), and then call it a day!

With a few simple touches, you can add a lot of depth to your miniatures without a lot of work.

Rotate your model and make sure you are not focusing on a single area. Spread the details around the miniature. You’ll play and display it from many angles (or at least most of you will).

Let your viewers’ eyes travel over the model by adding interesting points in different places. When you focus your painting effort, make sure the “face” is well painted. The face carries the rest of the model in most cases.
Optional steps
For many hobby painters, decals are challenging. If you want to go that extra mile, they can add realism or immersion.

A quick tip with decals is make sure you plan ahead. In other words, apply your decals before you add weathering or other surface effects, e.g., battle damage. This way you have a method to make your decals blend-in with the rest of your model.
RELATED: HOW TO APPLY WET TRANSFER DECALS ON WARHAMMER MINIATURES AND OTHER MODELS

Decals should sit inside the rest of your paint job and make the whole model feel more complete.
Finally, I suggest protecting the model with a varnish. Here is my guide to using matte varnishes.

A good coat of matte varnish will improve the final look of your model by evening out the reflectiveness of your painting. This also has the additional benefit of making your miniature paint job more photogenic.

Final Word
Well, there you have it: a yellow paint job on a Primaris Imperial Fist Inceptor Space Marine. Quick, fast, and simple, I’m quite pleased with how this miniature looks.
In case you missed it, here are the 7 easy steps for how to paint Imperial Fists (or other yellow color models)
- Prime white or light gray
- Apply a single coat of Iyanden Yellow Citadel Contrast paint
- Let your yellow base coat dry completely
- Dry brush with a complementary yellow paint
- Add highlights with dry brushing
- Add accent colors
- Finalize details
There are many ways to paint yellow. Here’s another fun and unique example of how I paint yellow on larger vehicle models, where Contrast paint is not feasible.
I hope this article was helpful and gives you some inspiration to paint more yellow 🤪.
Thank you for stopping by!
Happy painting!
Enjoying your visit? Join Tangible Day!
Leave a comment, or follow Tangible Day.


Tangible Day on YouTube (Miniatures and More!)

By Andrew M. Tan
Andrew is a commissioned miniature painter with more than 20 years of hands-on experience painting tabletop miniatures, photographing models, and testing hobby tools in real-world use. Read his full bio.
I have an interesting idea for you: turmeric. I noticed that it stains everything other than polished metal or glass very easily, so I wonder if you could get the results you want by sticking models that are painted white (or made of white plastic) into a pot of warm water with turmeric dissolved in it. I’ll probably run this experiment myself, but I have no idea when.
Hah that’s a great experiment! I have an article up on painting with instant coffee. Check it out! – https://tangibleday.com/painting-with-coffee-miniatures/
Oh let me know when you do that experiment to stain yellow with turmeric. I’d love to see how it turns out and share what you find out.
I sent you a link to a video of my experiment. Hopefully it didn’t end up in your spam folder.