
Last updated October 19, 2023. By Andrew M. Tan.
Are you painting miniatures and looking for new techniques to try? Miniature painting tutorials are everywhere. But, the use of watercolor for washing miniatures is a fairly unique way to paint models.
In this article, I show you how to paint a warjack from the Retribution of Scyrah faction of Privateer Press’ Warmachine tabletop strategy game. This model represents one of many in an army collection that I’ve had for several years.
Privateer Press has a unique line of steampunk inspired miniatures. A mix between magic and science, the Iron Kingdom World these characters inhabit is as fantastical and mysterious as the Games Workshop Warhammer 40k universe (albeit not as dark). The color scheme is different from the studio box art.
READ MORE: HOW TO CHOOSE A PAINT COLOR SCHEME (5 TIPS)
Read on to see how I painted this tabletop gaming miniature with 10 simple steps using watercolor wash along with standard acrylic painting techniques.
Here are 10 easy steps for how to paint a Warmachine warjack using watercolor paints as a wash.
Step 1 – Prime your model
Priming is the most important step of painting any miniature. Primers lay the foundation for everything else you do for painting a model. I write about the best spray primers for miniatures and models here. Spray primers are the best for priming your miniatures because they provide an even coat.

In this case, I started with a zenithal highlight using a combination of spray black primer, followed a sprayed-on white primer from an overhead position.

You can use spray primers with an airbrush (by using something like my favorite Vallejo Surface primer), or aerosol primers from a spray can (lots of options).
Step 2 – Apply darkest main color
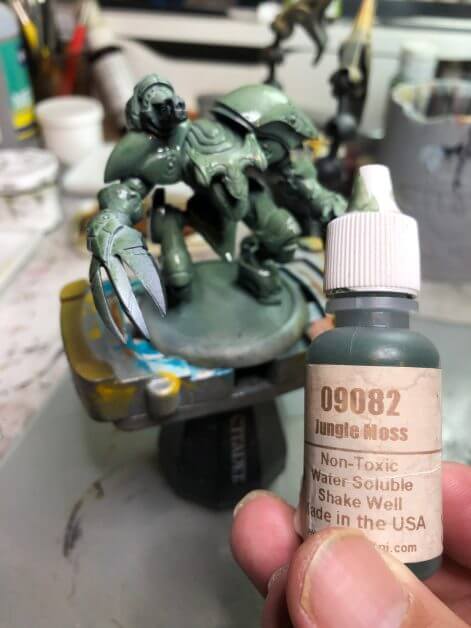
For a model this size, I generally like to start with the darkest value of the main color. In my case, this was green. I chose Reaper Series Jungle Moss as the first dark green paint. You can pick up the green colors I used as a triad set.
To apply this paint quickly and evenly, I used an airbrush. My Badger Sotar 20/20 was perfectly suited because Reaper paints are easy to thin for low pressure airbrushing.
I thinned the paint down to the viscosity of milk. I used a ratio of 1:1 of paint to Vallejo Airbrush Thinner.

The key to good airbrushing is proper paint consistency. Paint thickness effects how well the paint atomizes in the air stream.
You’ll know you have the proper mix of air and paint when you see the paint hit the model. The paint shouldn’t pool or create spider-web like splatters. Instead, it’ll cling the the primed surface in a smooth looking color change in tone.

What are some starter airbrush tips for painting miniatures?
In general, the correct airbrush pressure for painting miniatures is around 20-25 psi (pounds per square inch). If your paint is thinned correctly, then the nozzle shouldn’t clog and the paint won’t splatter when it hits your model.
With a nozzle tip size of between 0.2mm and 0.4mm, you shouldn’t have to do much to keep the paint flowing consistently.
It takes some practice to learn how to adjust the two key factors for airbrushing: air pressure and paint thickness.
What are the best model paints for airbrushing?
The best paint sets for painting miniatures with an airbrush are the following:
- Vallejo Model Air
- Vallejo Game Air
- Master Reaper Series mixed with an airbrush thinner
- Citadel Airbrush Paints
The reason I mentioned these four paints is because of their ease of use and consistency. They work. Simple as that!
Step 3 – Paint the main mid-tone color
The mid-tone for this model is a step brighter than the triad set would suggest. This is because I want to maintain high-contrast on the model.
The best way to make a miniature “pop” off the table is keep a high contrast paint job.
Contrast is king.
As written elsewhere, contrast is a measure between far apart your light and dark colors are from each other. For example, a high contrast model has dark shadows and bright highlights.
For the mid-tone paint color, I chose Pale Lichen. This light gray-green color is almost gray in appearance, but maintains that green-organic feel.
For a faction that may hide in the forests and wooded areas in the Iron Kingdoms, I wanted this model (and the army) to feel at home.

As before, I used my airbrush to apply this paint. Thinning with the method I detailed above, I applied a single coat over a smaller surface area than the first dark Jungle Moss color.
Step 4 – Paint the highlight color
For this step, I used the airbrush to paint the highlights. I thinned Creamy Ivory (Master Reaper Paint) using a 1:1 ratio of paint to thinner.

I airbrush sprayed only the top highlights in a much smaller area over the model. This added the highlight contrast I was looking for while keeping most of the model green.

Be careful when applying highlights. Often, if you apply too much highlight, you end up making your model look like it has a different color, or even washed out. Those bright paints tend to take over.
Step 5 – Paint the details
I continued using my airbrush to paint other elements of the model.
As noted above, I’m airbrushing with a Sotar 20/20, which ideally suited for details. It has a 0.2mm nozzle, which is really small for an airbrush.
Lowering the pressure to 15psi or so helps me to control the detailing spray pattern. Thinning the paint to an almost ink like consistency also helps.
Airbrushing detail is where you need to experiment and practice. Controlling paint through an airbrush over small surface areas takes a lot of experience.
I’ve screwed up a lot of models learning how to airbrush.

But, if you keep at practicing your airbrush skills, the results are worth it. Not only can you control the paint, but you’ll get much faster at painting effects that would take ages with a normal brush.
The kind of color blending you can achieve with an airbrush is sublime.
Check out the claws on this model. Up to this point, it has taken me less than 30 minutes. The claws themselves only took another 5 minutes to complete.
If you are speed painting and have a lot of models to finish, learning to airbrush well is worth the pain.
For this model, I wanted to paint the claws with a non-metallic metal (NMM) look. In other words, I wanted to use regular paint to make the claws look reflective, almost metallic.
Check out this article for more details about NMM painting. For more tutorials, look here.
Step 6 – Use a “black” watercolor wash to darken the recesses
Remember what I said about maintaining high-contrast?
To darken the recesses and shadows, I opted to use a less conventional technique.
MORE: PRO TIPS FOR USING ACRYLIC WASHES FOR MINIATURES AND MODELS
Sometimes video is the best way to show you how something is done. Check out the video below I posted to my Instagram page.
Before you apply watercolor to your model, remember to varnish using a gloss sealant like this. Best applied with an airbrush, the gloss varnish will protect your underpainting.

If you don’t have an airbrush, you can use a spray can gloss varnish.

The advantage of using watercolor paints as a wash is the ability to clean it off without damaging the under painted parts of your model.
To use watercolor paints as a wash, merely add water to a small dish or glazed ceramic palette until it is runny. Because you can’t really mess up watercolor (it washes off with water!), you can play around with different water-paint mixes.

Fun right!?
I recommend this watercolor gauche set for washing miniatures. It’s affordable.
| Watercolor gauche set |
|---|
 |
| Price on Amazon |
| Price on BLICKS Art Materials |
In fact, you don’t need to spend a lot of this technique at all! Watercolor paints are inexpensive compared to acrylic paints anyway.

Make sure you get “gauche” watercolor paints, which are the opaque type watercolor paints you’ll need for this wash technique.


Once you’ve applied the black watercolor paint to nearly every recess you can find on the model, e.g,, armor plate lines, between main elements, etc., let it dry.
Let the watercolor dry completely. Then, using a damp clean brush or wet finger, rub off the excess watercolor pigment from the model.
The washed recesses should stay black/dark. See the photos above.
Step 7 – Use a “white” watercolor paint to highlight raised edges
Add more contrast by bringing white into the picture. You can either do this step with a brush and the watercolor paint (usually from a tube), or with a watercolor pencil.
A white watercolor pencil will give you a lot of control. And, control is what you’ll want for making this step easier.

Take the edge of your watercolor pencil and scrape it along the hard edges of the model where you think the light will hit a surface.
The white pigment will deposit as a thin white line. If you like, you can “feather” this line out to soften the edge with a damp clean brush (dipped in water).

If you mess up, merely wipe off the white color with water. Nothing you do with watercolor paint in this step (and the previous step 6) is permanent. You literally can’t mess this up.
For hard edges, the watercolor pencil is easier. For softer highlights, use a brush with white watercolor paint.
If you want to add brighter highlights to bigger surface areas, go back to your watercolor palette and apply watercolor with a brush. It’ll be easier to smooth and feather the white highlights out.
Once you are finished and satisfied, apply another layer of gloss varnish. This will “bookmark” your work and protect it from accidentally being washed off in the next steps.
Step 8 – Add special “glow effects” with colorful watercolor washes
Also known as object source lighting (OSL), you can add glow effects with watercolor paints.
For this model, I don’t go to the extreme contrasts required for proper OSL, but the principle here is the same.
You add brightness to a small region on a model that extends (or glows) outwards from there.
For this warjack, I wanted a Tron like feel to the energy lines.
So, I mixed blue and white watercolor paint in my glazed ceramic palette.

By adding more or less white, I was able to get the bright blue color I was looking for. Because this is watercolor, I could test the color directly on the model without worrying about mistakes.

The easiest way to show you how I applied this mixture is through a video I made posted on my YouTube channel.
Briefly, I took a clean brush and applied my blue/white mixture to the recessed lines that I wanted to “glow”. The blue color worked nicely with the green main color I had on the model.

After you’ve applied the watercolor paint, you can wipe off the excess with a damp brush or your finger.

The final result at this point will be a little shiny because of the gloss varnish you applied earlier. That’s okay.
Keep painting any other details you want on the model. When you’re finished the next step will solve any reflective issues you have with the gloss varnish.
Step 9 – Varnish your model
To protect your model, always use a varnish.
The best varnishes are spray on varnishes.
RELATED: RECOMMENDED MATTE VARNISHES AND TIPS FOR BEST RESULTS
My favorite varnish for miniatures and models is a matte varnish made by Testors called “Testors Dullcote“. It is the best enamel-based varnish you can get for protecting your models.
Testors Dullcote also provides an even matte surface. The cuts out reflections that destroy the hard work you put into maintaining a high contrast look to your model.
Removing the light hotspots also makes models varnished properly easier to photograph.
Overall, I highly recommend you varnish your model with a matte coat to both seal-protect your model and maintain the color and contrast you worked so hard to paint.

Step 10 – Base your model
The final step with any miniature is completing a scenic base. For this model, for instructional purposes, I decided to keep it simple.
I merely used an unsanded tile grout (read about why and how I use unsanded tile grout for basing here) that I inked brown. I painted the edge of the rounded base black with an acrylic ink.
The video below shows you how I did this.
Summary
I hope you enjoyed this article. I love trying out rarely used techniques, like using watercolor paints as a wash.
Sometimes when you try new things, you discover how to perform certain tasks easier, faster, and better.
This warjack project was a great example of how you can take an unconventional approach and make it work to your advantage. Watercolor paints are great because they let you go back and fix things to your liking without worrying about messing up.
Clean up is super easy with watercolors as well. All you need is water!
Enjoying Your Visit? Join Tangible Day
Free newsletter with monthly updates (no spam)


Tangible Day on YouTube (Miniatures and More!)

By Andrew M. Tan, PhD
Andrew is a commissioned miniature painter with more than 15 years of experience painting tabletop miniatures, photographing models, and testing hobby tools in real-world use. Read his full bio.
Awesome tut! Thanks