Last updated October 13, 2024. By Andrew M. Tan.
How do you paint power swords and weapons? In this article, Damon Rooney shares his talent and tips on how to paint these iconic gothic weapons for Warhammer 40k and your other favorite miniatures games.
Read on to learn tips and insights into painting power weapons with that mystical glow. Whether you want to recreate the blue lightning effect, or the eerie green of an Eldar blade, this power weapon tutorial will add a new dimension to your painted miniatures.

Damon Rooney’s Top Tips for Painting Power Swords and Weapons
- Go for a high-contrast color scheme
- Use washes or glazes to build up colors and blend your underlying pattern and textures
- Create depth with different shades of the same color
- Enhance the brightest highlights with white paint
- Pay attention to the details, but don’t get bogged down


Introduction
Hello mini painters! Due to popular demand, I have decided to create a tutorial for how I paint power weapons for Warhammer 40k models, in particular for my Adeptus Custode army! Are you looking to paint those nemesis force weapons? Read on!
It’s a process that I very much enjoy and I hope that this helps you all create vivid, crackling weapons that pop with vibrancy!

For those looking for a easy-to-learn way to paint power weapons with that buzzing energy field, you’re in for a treat. The following the same process I use to paint power swords for many of my models. Painting techniques may vary depending on the model, but the core process is always the same.
How to Paint Power Swords: An Easy Step-by Step Guide
Materials Needed
First, adapt this to your needs for whatever power weapons or swords, e.g., Nemesis force halberd, sword, spear, whatever. I am going to list the ingredients I use for my specific recipe, but I am sure you may want to experiment with different colors. The principles laid out here should apply, but are dependent on a few things. I will break that down momentarily.
To copy the exact recipe I am using in this tutorial, use these materials:
With the ingredients out of the way, I want to make the principle of this scheme clear. You need a vivid, pigment rich paint for your color. Due to their transparency, inks and Citadel-type contrast paints will not work. This is a lesson that I learned through a lot of trial and error.

I really enjoy the effect of the Bright Jade. I have done this method with Scale 75 Antares Red and Sunset Purple, and while it looks good (due to them being pigment rich), they don’t have the vibrancy that the Bright Jade has.
By all means, play around with this if you don’t want the exact color scheme I am doing. We learn by experimenting!
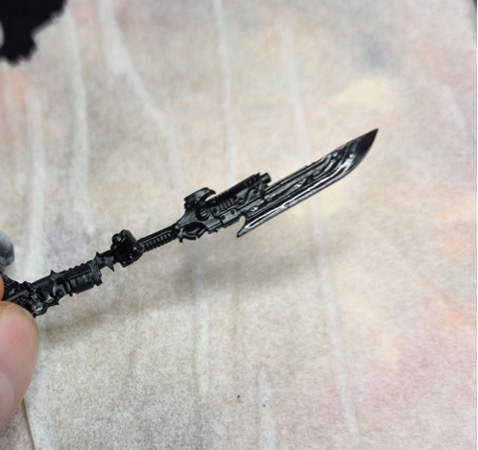
As for the model I’m painting for this tutorial, I’m using a spare Venatari Custodes Lance (a really cool spear weapon with a blade). You can find this bladed weapon in this Adeptus Custodes box set.
Step 1 – Prime and Base
Prime the blade black. Actually for most Warhammer 40k swords, I recommend starting with black. We need to do this because we will be basing the blade a dark gray/black color!
I prefer Scale 75 Black Primer through my airbrush as it is very matte and provides excellent coverage. However, because I’m out of airbrush thinner, I used Army Painter Black Spray I had lying around. Here are other great primers that work well for painting miniatures.

After you’ve primed your model’s surface, we can move on to painting the first base coat color.
To create the base coat color I want to start with, I mix the black and gray paint with contrast medium.

The ratio for this mixture includes, 4 drops of Citadel Contrast Medium, 4 drops Tenebrous Gray, and 2 drops of Pro Acryl Transparent Black. You could substitute any black paint here, but the Pro Acryl black is just visually appealing to me.

To apply this base color, we simply run the brush all over the blade. The great thing about this mixture is that it covers very well; so if you are repainting weapons and don’t want them primed black, this will do the trick in one or two passes!
After you’ve coated your model with the base color, give it about 5 or 10 minutes to dry, depending on how thick you applied it.
Step 2 – Painting the Power Sword Lightning
Now, this is where the fun begins! Remember where I said you want vivid, pigment rich paints? This is why….As you see in the image below, I’ve prepped my wet palette like with the colors that will make up the glowing parts of the blade.

From left to right, we have mixtures in the following ratios:
- 4:1 Glaze Medium and Bright Jade
- Bright Jade
- 3:1 Bold Titanium White and Bright Jade
- 1:1 Bold Titanium White and Bright Jade
- 4:1 Glaze Medium and Bold Titanium White Paint
Light Blue Sketching for Lightning Pattern
Now we sketch in our lightning patterns. This will take a little practice for those of you who haven’t done this before. But with some time and patience, you’ll pick up how this works quickly.

To make sure the light blue isn’t too overwhelming, I do this sketch in two layers. I want enough coverage with the blue hue to avoid having the black undercoat from showing through too much.
As you’ll see later on, we need some of this black to remain visible.
Don’t even bother thinning the paint (weird I know).
To start blending the different blue hues, you can use wet blending within the lightning pattern. You’ll see how the colors of Bright Jade and white come together with smooth transitions. Here, I make the energy source pretty white here to emphasize the power nodes at the bottom of the blade.

Step 3 – Glaze the Midtone Color Over the Entire Blade
Now, we need to take our Jade Glaze and run it all over the blade. Wick off some of the extra paint from your brush, but not too much. This color is almost going to act like a wash.
The goal here is that we want to tint the black in our respective energy color.

If the blade is not tinted enough, do a second pass with your glaze. Make sure you let each layer of your glaze dry before adding another coat. In my experience, one pass with the glaze is enough.
What’s cool about this technique is that you don’t need masking tape or any fancy edge highlighting to make this work. Once the sword has been tinted, we now start adding some magic.
Step 4 – Highlight the Lightning Effect
Load up your sharpest brush with the white glaze from your wet palette. Wick almost all the glaze off the bristles. This gives you more control of the paint.

Now, very carefully, trace white lightning bolts inside the original lightning shapes we sketched.
Step 5 – Push the Glow
As a final step, approach each painted side separately and keep building up the white color where the energy source appears to come from.
Once you have used the majority of the white on your brush (that you loaded in step #4), gently feather “bursts” of lightning where it meets the blade edge to give a crackling effect. This extra bit of edge highlight glow will help sell the glowing effect on the model.
It’s very important that your paint is very thinned down here. White can be very bold, and we don’t want that in our initial pass. We want a nice blend.

Add a bit more glaze of the Bright Jade on the surrounding materials to help sell the object source lighting (OSL). You can see a bit of this on the top of the hilt, some seeping into the recesses.
And really, that’s it! What do you think?

Conclusion
So, there you have it! My simple guide on how to paint power swords and weapons for your miniatures. This tutorial shows the steps involved in creating a vibrant, glowing blade with realistic-looking lightning patterns.
If you follow these steps carefully, you’ll be able to create stunning power swords that will really stand out on the tabletop. Have fun experimenting with different colors and effects to create unique blades that represent your army’s style and theme.
Thanks for reading! Happy painting! Do you have a question or feedback? Leave a comment below. 😀
About the Author: Damon Rooney

Damon is a father, soldier and martial artist who hails from Craftsbury, Vermont. He is an instructor at the Vermont Army National Guard and also serves as a reconnaissance section leader. Damon is an avid miniature painter and tabletop wargamer, including Warhammer 40k and role-playing games.
As a working father, he appreciates any support you can give him in the form of donations for materials that will help him continue his hobbies. His Venmo account information is below, so please consider donating to help this amazing individual!

Enjoying Your Visit? Join Tangible Day
Free newsletter with monthly updates (no spam)


Tangible Day on YouTube (Miniatures and More!)

By Andrew M. Tan, PhD
Andrew is a commissioned miniature painter with more than 15 years of experience painting tabletop miniatures, photographing models, and testing hobby tools in real-world use. Read his full bio.
This looks amazing. Definitely going to try it – was literally just thinking earlier today how cool this kind of effect would look on a power weapon them stumbled upon your guide. Would love to see a video tutorial if you ever feel like making one!
Hi, thank you so much for the comment. Yes I hope it helps. And the video tutorial would be a great idea ! Stick around and I’ll try and plan one out 🙂