
Are you looking for simple tips to improve your miniature photography? Taking better pictures of your models and miniatures can really enhance your enjoyment of the hobby. Whether you’re a tabletop wargamer, a miniature painter, or scale modeler who creates immersive dioramas, you’ll want to capture great photos of your work to share with others.
Here are 10 simple tips for better miniature photography:
- Use a tripod
- Control your external lighting
- Mind your depth-of-field (DoF)
- Compose your models
- Use proper white balance
- Matte varnish your models
- Consider the background
- Use a good focal length
- Multiple or single model photoshoot
- Crop your image
Continue reading to see the 10 tips to help make your miniature and model photography awesome!
1. Use a tripod
Photograph is all about light. Controlling the amount of light that enters your camera is a technical skill in photography. To take a photo, you expose your camera’s sensor to light by opening the shutter. When you press the shutter button, light can enter the lens and hit the sensor inside the camera body. In a smartphone, the shutter is often electronic, but the principle is the same as a regular camera. Any camera captures a finite amount of light.
The more light that hits the sensor in a camera, the more information your camera will have. Of course, too much light will overexpose your image and ruin it. So be careful, too! You can learn more about the exposure triangle and the importance of photography lighting in this review article.
One simple way you can get more light on your camera’s sensor is to stabilize your camera with a tripod. This will allow you to keep the shutter open for longer periods of time. You can get affordable tripods for cameras or smartphones. It’s up to you and what equipment you already have!
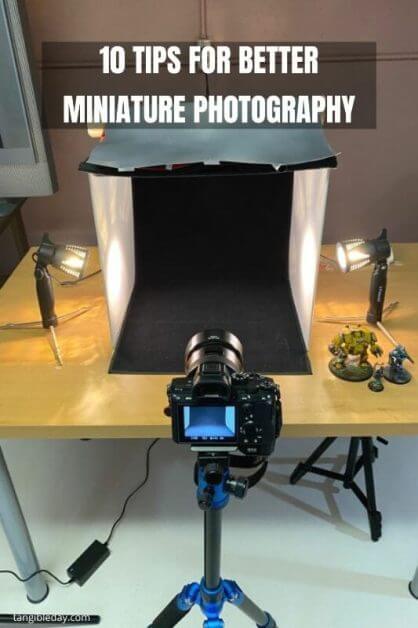
A tripod allows you to take photos of your models with less blur and shakiness in the image. You will have less “noise” or “grain” in the photo because you can use a lower ISO setting. ISO is a setting a camera uses to digitally amplify the brightness of a photo when the environment is too dark. The side-effect is grain or noise in the photo, which can look weird when the ISO is too high. You can learn more about ISO and noise here.
Ultimately, you’ll have better quality images if you’re stabilizing your camera or smartphone with a tripod, and allowing the proper amount of light through to the sensor.
2. Control your external lighting
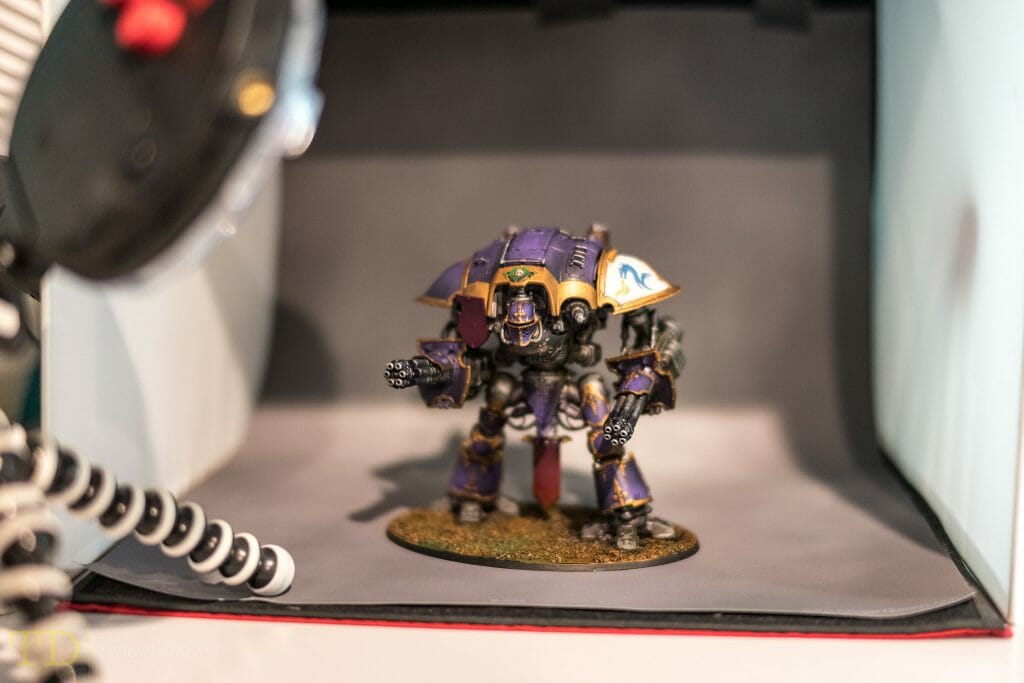
Photography is all about light. The more you are able to control the external light around your model, the better your photos will be! One of the best ways to control your lighting is to use standalone constant-on LED lighting. You can see the use of photography ring lighting in this guide here.
The best lighting for photographing miniatures are continuous LED ambient lights with proper, diffuse brightness and high color rendering index (CRI) ratings. A high CRI rated light will help you reproduce accurate colors in your camera when you take a photo, e.g., more natural and vibrant color and contrast in your images. Here’s a nice example of a high CRI (>95 score) light for photography and videography.
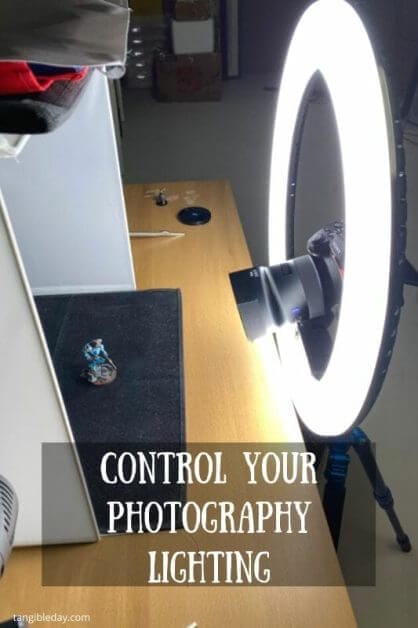
Another tool you may find helpful is a photo light box. This tool further assists you in controlling the light that hits your model and by extension helps your camera “see” your subject better. Collectively, for the best results in miniature photography, learning how to control the external light around your model is one of the most influential (and simple) things you can do.
RELATED: BEST DESK LAMP AND LIGHT FOR MINIATURE PAINTING AND HOBBIES
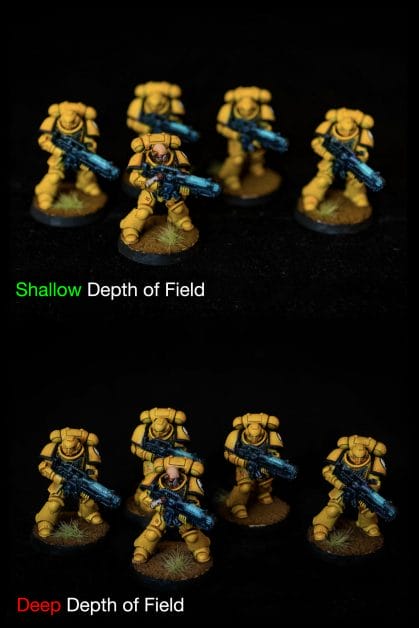
3. Mind your depth-of-field (DoF)
Depth-of-field refers to how much of your subject is in focus in the image. For example, a shallow depth of field is what causes the artsy blurry backgrounds in all of those glamorous portraits of beautiful people. Also known as bokeh, the blurry background has a fairly special use case for a lot of photography. But, producing bokeh in miniature photography can often lead to a poorly captured image that doesn’t show off the complete model.
Miniature photos with a few major parts of the model that are out of focus are generally not very good looking, and don’t show off the hard work that went into the model.
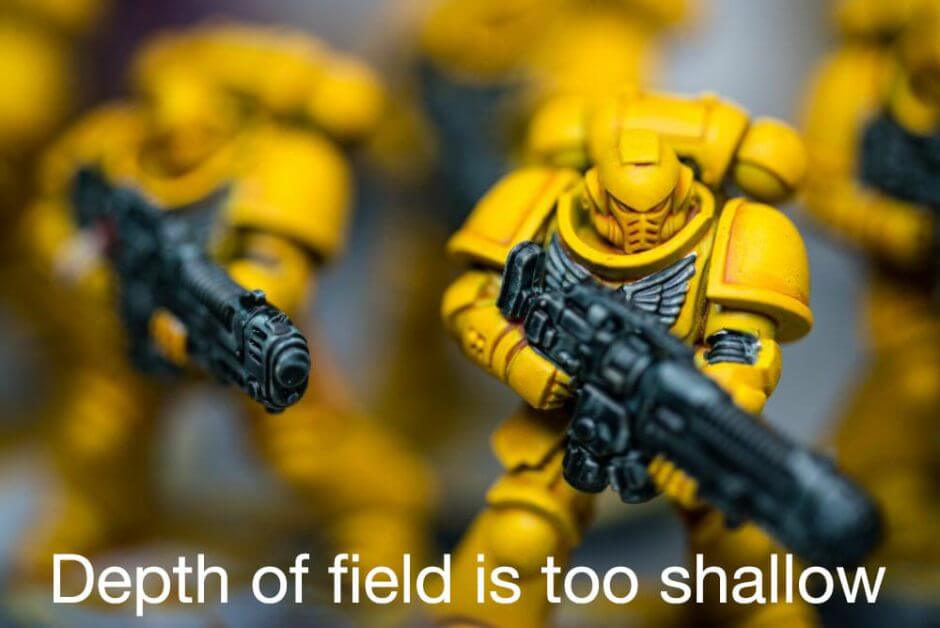
So, how do you increase your depth of field with your camera? If you find your miniatures or models are out of focus on some parts, but sharp on other bits, you can do two things to deepen your depth-of-field:
- First, you can close your aperture (i.e., use a smaller f-stop setting). I recommend using an f-stop value of 8 or more. Of course, you may still need to compensate for the loss of light (see tips #1 and #2).
- Second, you can deepen your perceived depth of field in the image by moving your camera back away from your model. This works because there is a direct relationship between the DoF and the distance of the subject to the camera’s sensor. As the distance of the camera from your model increases, your DoF also increases.
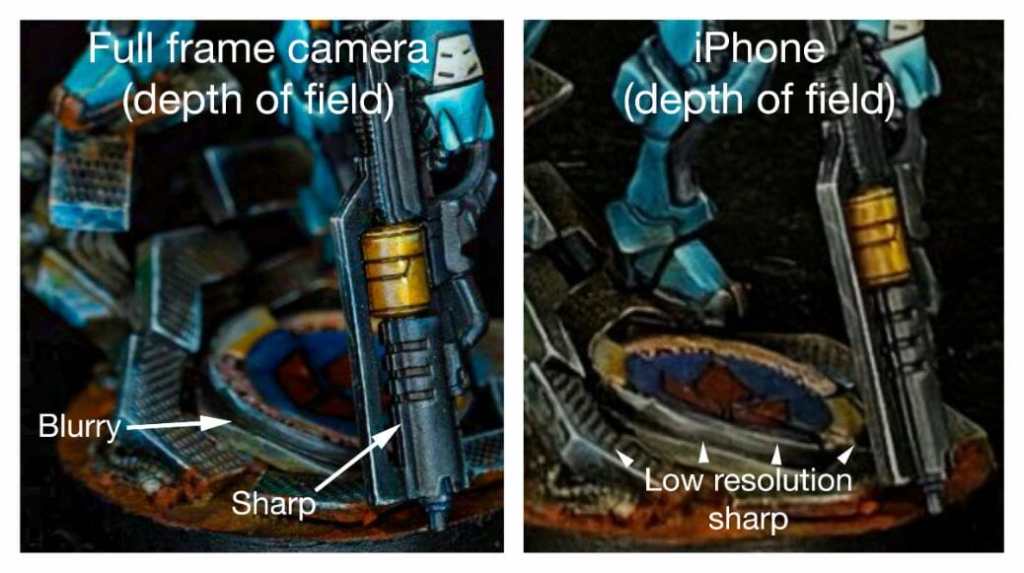
Note that if you are using a smartphone to photograph miniatures, you may not need to worry about DoF. Smaller camera sensors have naturally large depth of field (source).
READ MORE: WHAT IS BETTER? SMARTPHONE OR CAMERA FOR MINIATURE PHOTOGRAPHY
For a professional way to achieve large depth of field by compositing multiple images, you can see this guide about “focus stacking”. Focus stacking is a powerful way to create more compelling and realistic miniature photos. It is one of the tricks that Felix Hernandez uses in his amazing miniature photo work.
4. Compose your model
As with any subject, some angles look better than others. With miniatures, the same is true. Every miniature has a best angle, or silhouette that makes the sculpt come alive. The most talented artists and sculptors in the world take into account a particular facing or composition of their piece as they create.
For military scale modelers, you’ll also find that vehicles and mechanized miniatures also have a best angle in photography. You can check out car magazines as a relevant example of this point. Advertisements for cars, trucks, motorcycles, and even boats use photos with a particular “look” created through careful composition of the shooting angle, etc.
In your miniature photography, you’ll want to play around with your model to find the best photography angle. This may not even the the same as what appears on the box art when you purchased the model kit. It depends on your eye, your vision, for what looks good. Experimenting is actually one of the more fun aspects in miniature photography for me.
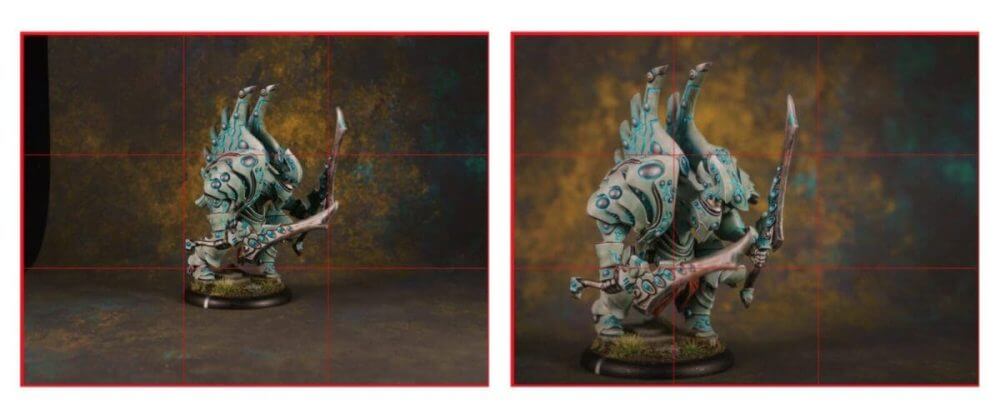
Another relevant point about composition is using the rule-of-thirds. The rule-of-thirds recommends that you place your model subject in the camera frame, such that it sits about 1/3 from either side or from the top/bottom of the frame.
Placing your subject in this manner makes an image more interesting to look at for a number of reasons. It keeps the viewer from getting bored or “trapped” inside your photo. A viewer’s eyes can wander around your miniature photo when your subject doesn’t sit squarely in the middle of the picture. Learning how to compose a photo is an art in itself. You can read an interesting article about photographic structure here.
5. White balance
The color of a photo is important, obviously. For photographing painted miniatures or scale models, you need to consider the correct white balance. White balance refers to the colors in the photo in relation to pure white. Proper white balance (also known as color balance) will help make you create images with accurate and good looking colors.
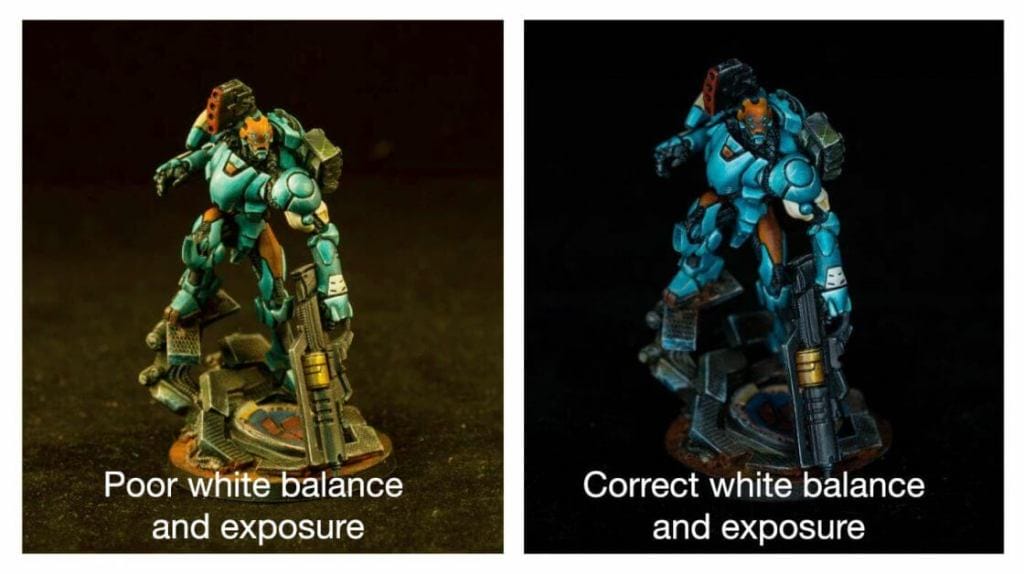
Most smartphone or dedicated camera systems have an auto white balance feature that will correctly adjust your color temperature and tint. But, if you find your colors are off, you may need to correct your white balance in post-processing software like Lightroom or apps like Google’s Snapseed. You can learn more about how to adjust white balance in your photos with this article.
6. Matte varnish your models
A common problem with creating great miniature photos is harsh reflections on the model. Specular lights or hot spots will distort color and reduce contrast in photos.
Have you ever noticed that some models have an uneven glossy surface to them? This is because model acrylic paints dry with different gloss finishes (due to the chemical formulation in different brands or colors). To fix this issue, all you need is an even coat of a matte varnish (see a review of my favorite matte varnish for miniatures and models). 1-2 coats of a Testors Dullcote varnish will do the trick.

The other simple way to remove unwanted reflections on your model is to use a proper diffuse lighting system for studio photography (this is what I often use). You could also try moving your lighting source further away from your model, which will spread out the light on your miniature. Combined with a good matte finish (e.g., a less shiny varnish), these changes will greatly improve the contrast and color in your model photography.
Give it a try!
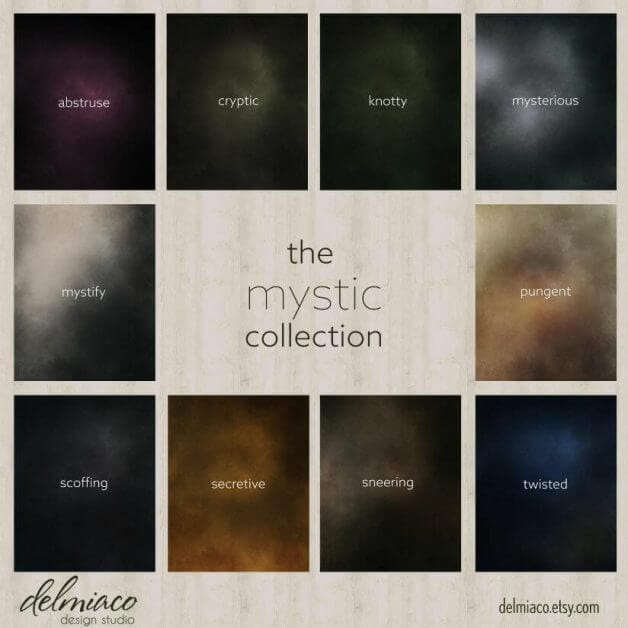
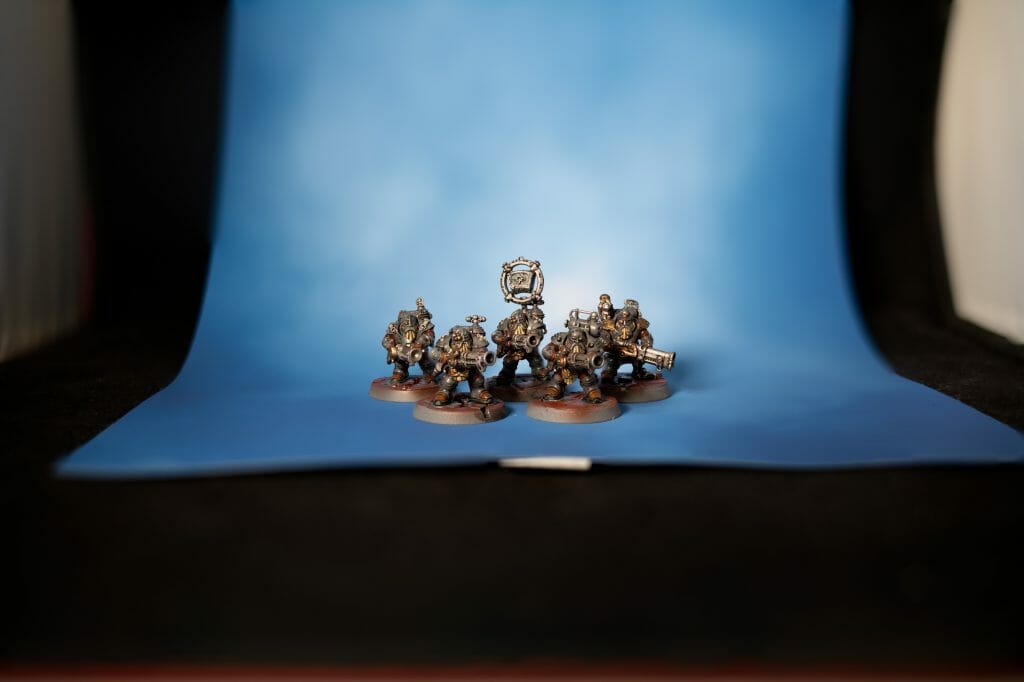
7. Consider the background
The context of how you place your model in the frame matters. In other words, consider where your model is in space and time. What kind of environment do you want to surround your miniature with?
When you consider your model’s environment, you give it a certain life. The background in your photo is how you accomplish the final story telling element in your miniature photography. Remember, it doesn’t have to be fancy! For my recent work, I have decided to use a simple black backdrop. This places my painted miniature front and center. Although the environment is “nothingness”, the backdrop still informs the viewer.
A dark solid backdrop says, “look at the model, not over there!”.
On the other hand, you may prefer using a backdrop that sets the stage for other events/happenings. This could be a backdrop of a ruined cityscape of a war torn battlescape. This would work well with military scale models, sci-fi or historical.
Popular backdrops also include colored gradients or blurred patterns that attract and direct a viewer’s eye toward the miniature subject in the photo.
Whatever you decide, consider the backdrop. It matters. As a final tip, try and keep your backgrounds simple. You want your viewers to see your miniature subject, not your dirty coffee mug or a stray electrical cord. And, by all means, keep your surfaces clean! Wandering pet hair and dust can ruin a great photo!
8. Use a good focal length (camera or smartphone)
What is the best focal length for photographing miniatures? This is an important question! Focal length refers to whether your camera lens produces a zoomed image, wide-angle, or normal field of view photo.
For reference, your smartphone, e.g., iPhone, has a camera that uses a full-frame equivalent 24-28mm focal length lens. This is the most versatile focal length for capturing moments and day-to-day activities, including selfies. A normal wide angle focal length, like 24mm, can produce accurate images at normal viewing distances. However, for close up photography of miniatures, these wide-angle focal lengths can distort shapes and forms.
For more accurate photos of your models, you’ll want to use normal focal lengths of around 50mm. On a camera, you can use longer lenses, also known as telephoto lenses, for miniature photography. If you want to use these longer focal lengths on a smartphone you may need to buy a telephoto lens attachment. These smartphone lens kits are fantastic for helping you leverage your smartphone’s camera for miniature photography.
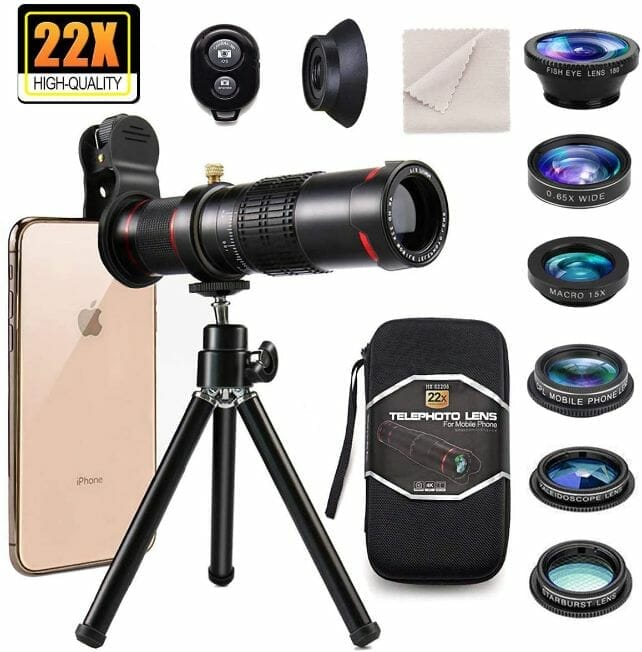
Although I don’t go into much detail here about the effects of using different focal lengths, you’ll notice that some lenses will produce odd things in your photos. For example, if you’re using a long focal length, e.g., a big zoom lens, then you will have to deal with a shallow depth of field (DoF) (see tip #3 above).
In general, for most miniature photography I recommend that you use a wide-normal (28-35mm) up to a long-normal (70mm) for most of your photography. These focal lengths will be easy to use and predictable. You will be able to produce sharp photos with your miniatures’ normal proportions intact.
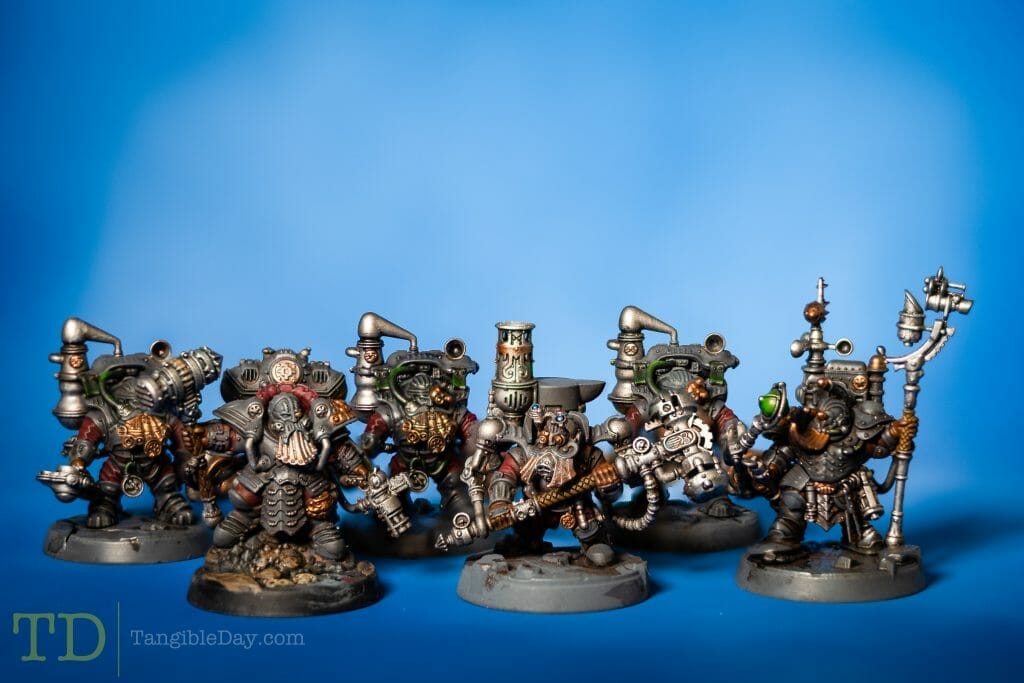
9. Multiple or single model photoshoot
When given a choice between two options, it is usually a good idea to go with the simpler choice. For most miniature photography, you’ll likely have a single model to photograph and won’t need to make a choice at all.
But, if you are trying to photograph a complete unit, then the best course of action is to try and see if you can get away with only photographing a single representative miniature. Using a single model to represent an entire unit (e.g., a 10 troop unit of space marines) is the simplest way to obtain consistently good photographs.
Photographing multiple models at the same time adds several layers of photographic complexity. As mentioned above, you’ll have to be more aware of issues arising with depth-of-field, lighting, and composition when photographing multiple models at the same time.
With multiple models, you’ll have have to wrestle with depth-of-field. For example, this is especially true if you want your back row of models to be as sharp as the front row. If you’re having trouble with out-of-focus minis in a group photo, take a look at tip #3 and to a lesser extent tip #8. Also, the use of post-processing compositing methods, such as “focus-stacking” can also help here, too.
Lighting may also be an issue with photographing multiple models at the same time. You may need to add extra lights to properly expose your models. Depending on the size, type, and your composition, you will need to adapt your lighting setup.
In regards to composition, when photographing multiple models, you’ll need to consider how to arrange the miniatures in the image frame. For example, I would recommend placing the most important models in the center of the group, or on the extreme side of the unit. These are the areas of the photo that will garner the most attention from a viewer.
Note that models groups in odd numbers, e.g., 3, 5, or 7, will be easiest to compose and arrange in your photo. So, if you feel comfortable with removing a model from an even group, you should do so to make your photo composition “cleaner”.
On the other hand, if you have to photograph an even number of models, e.g., 10 miniatures in a troop unit, then, you need to stage your models in such a way that every model is visible in-frame. You’ll want to stagger your miniatures in two or more rows, front to back, instead of lining them up shoulder to shoulder. This will give the illusion that your models can move around, which adds life to your photograph.
Don’t clump or cluster your miniatures, tightly. Similarly, don’t spread them out too far apart. The exception to these composition tips, of course, is if you’re photographing a diorama or staging a scene. In this case, your multi-model composition will depend on the story you’re trying to tell.
10. Crop your image
Cropping is a post-processing method you do after you’ve taking your photo. After you take your picture, import the image into your favorite photo-editing app or software. Here, you’ll want to consider following the rule of thumb to “fill your frame”.
Use the crop tool to remove anything around your miniature subject that doesn’t belong. Leave only your subject and whatever elements that help your miniature subject stand out. Leave some empty space, or margins, around your subject so that it can “breathe” and “move about” inside the picture frame.
The most useful and versatile aspect ratio I recommend you use for cropping is the 2:3 (vertical portrait) or 3:2 (horizontal landscape) aspect ratio. Photos with these ratio dimensions of height and width will fit into most social media posting limits without additional cutting or editing. When sharing your miniature photos, making sure your miniature photo crops are already within a standard aspect ratio will make your life much easier!
Remember, you can use cropping to also force your subject into the “rule of thirds”. Applying the rule-of-thirds guide when you’re cropping is a useful tool for improving your miniature photography composition after you’ve taken the photo. This is particularly true if you used a wide-angle lens, such as the standard focal length in most smartphones.
RELATED: HOW TO IMPROVE YOUR PHOTOGRAPHIC STRUCTURE
Bonus Tip: Use manual mode on your camera
Using manual mode is the most important technical skill you can learn to get better pictures of your models. This isn’t a simple tip (which is why it didn’t make the main list). But, if you want to take your miniature photos to the next level, then using manual settings is a key step forward.
The manual mode on a camera will allow you to adjust 3 important things:
- Shutter speed
- Aperture
- ISO
These 3 settings are part of the exposure triangle.
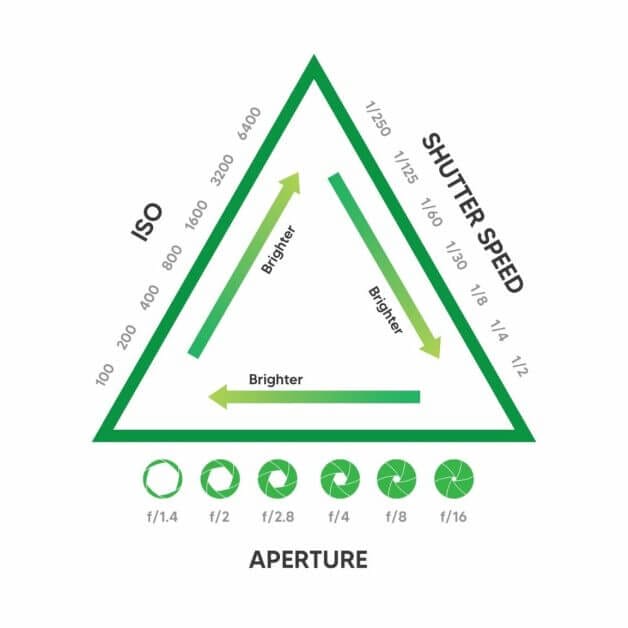
Shutter speed will control how quickly your shutter opens and closes. The slower the shutter speed, the more light enters your camera. However, moving subjects will appear blurry or shaky. In this case, you’ll want to use a tripod to allow slower shutter speeds without risking blurry photos.
Aperture controls how big or small the opening in your lens’ “iris” is. A bigger aperture setting (shown as a smaller f-stop number) will allow more light into your camera. But, a large aperture will also make your depth-of-field more shallow (see tip #3). This could make photographing large models or multiple miniatures at the same time more difficult.
ISO or International Organization for Standardization is a setting that controls the digital gain or sensitivity of your camera’s sensor. A higher ISO number artificially amplifies the image brightness captured by your camera. In other words, when there isn’t enough light, a high ISO can help you get a brighter image. However, if your ISO is too high, then your photos will be grainy or noisy.
Overall, the challenge to using the exposure triangle is the need to understand how to balance the effects of each setting with its respective limitations, e.g., increasing ISO makes things brighter, but grainier. Taken together, mastery of the exposure triangle is the path toward photographic guru status, aka more versatile use of your camera’s ability to capture awesome images.
Final Word
There you have it: 10 simple tips you can use to help improve your miniature photography. If you’re looking for more tips and tricks for your miniature and modeling hobbies, check out the other articles on the site. As always, I’m looking for new ideas and topics to cover here, and I love playing around with new gadgets. Leave me a comment and let me know what you think!
Happy taking pictures!

Tangible Day on YouTube (Miniatures and More!)
