If you are into photography, especially in events, you know that it doesn’t end in just shooting the photos. Whether you’re photographing people, landscapes, macro shots (e.g., flowers, miniatures), or simply family snapshots, post-processing your images goes a long way to finalizing the look you want. That’s the production phase and you still have a long way to go before you get the final image results. After getting the shots you want, you have to go through post-production where you transfer all the files and sort out the good ones and the bad ones. Once you have the best shots, you still have to go through the post-processing stage where you use software to give your images more impact. And here’s where your editing skills come to play.
You might need to correct the exposure, apply color toning, and fix other issues such as distortion, blemishes, and dust spots. You may also need to do more types of editing to get the photos you want. But ultimately, even the best shots may need some form of editing.
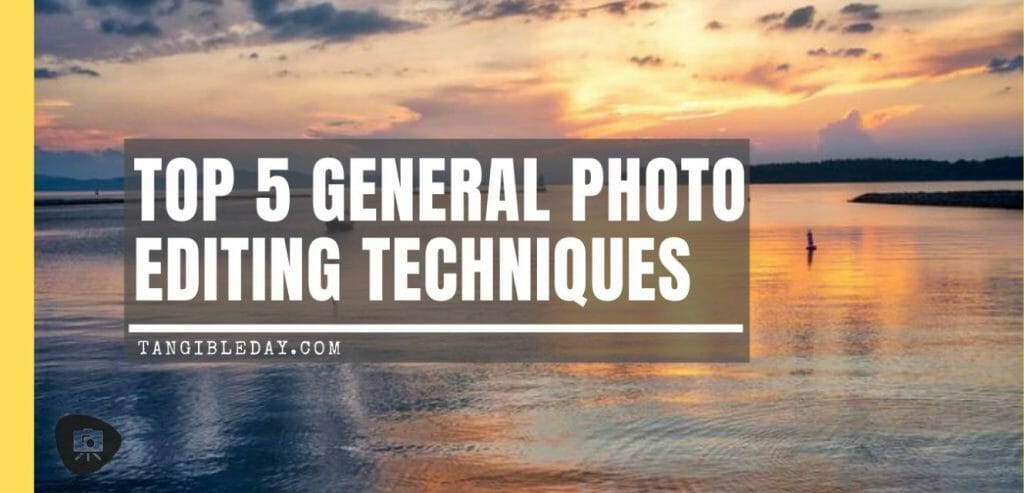
In this article, I highlight key photo editing techniques you should consider for your digital photos.
Here are the 5 must-know digital photo editing techniques:
- Enhance a picture’s color
- Remove unwanted image elements
- Efficient editing for a fast workflow
- Edit peoples’ features
- How to create a professional finish
Continue reading on for more details in how to edit your images.
RELATED: BEST PHOTO SHARING AND STORAGE WITH SMUGMUG (14 DAY FREE TRIAL)
How Important is Editing for a Photographer?
Simply put, editing can turn your photos from good to extraordinary – considering, of course, you have the skills. This is the step in photography where you can give your images a more polished, clean, and professional look.
By enhancing, toning down, or manipulating pictures, you can achieve a level of consistency. For instance, if you’re into event photography, not all of your photos will have the same lighting, tone, and effects, especially when there is more than one shooter. So to follow one theme and impress one client, the photos should carry the same vibe and tone from the first one down to the last.
For example: are you shooting black and white, or color?
Now, if you think about it, consistency also affects you as a photographer. What is your style? When clients view your portfolio, can they tell what you are going after? See, consistency helps you with your identity and brand. Additionally, editing can also change the meaning of an image. If you have a colorful and vibrant photo of a girl and turn it black and white, it becomes more dramatic and serious.
You might also need editing to meet your client’s needs and requirements. Depending on how they will use the photo, you might need to remove the background, add words, change certain colors, etc.
So how important is editing for a photographer? The answer is: VERY IMPORTANT. It helps you achieve your vision and it gives you a chance to add or remove some of the things you might have missed during the photo shoot.
5 Editing Techniques to Use in Photography
Now that you know how important editing is for every photographer, here are some of the best techniques to help you out with your editing. Just a head’s up, all these are done on Photoshop. I use the cloud-based Photography plan, which I think is a great deal!
For more details about how to use Photoshop, you can also check out the highly-recommended Photoshop for Dummies.
1. How to enhance the picture’s color?
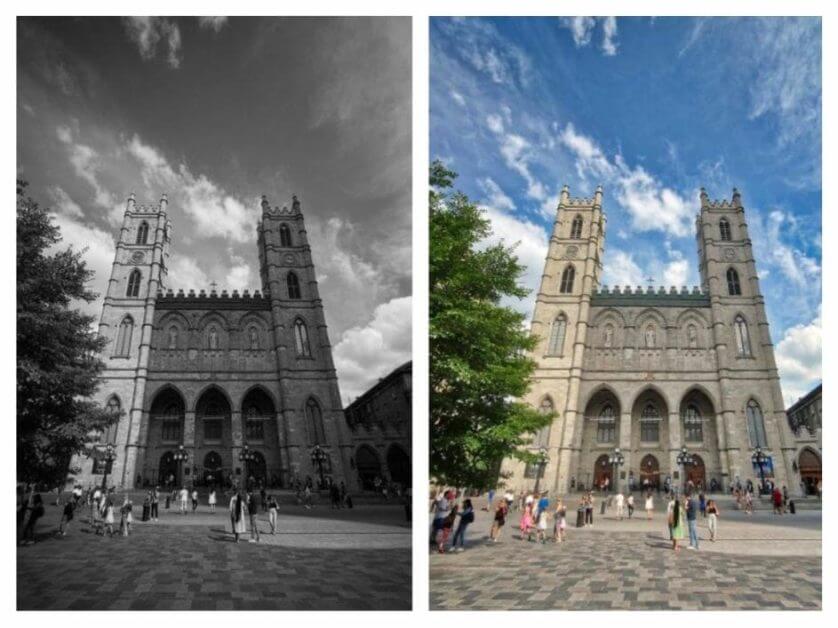
Color is one of the most important elements in a photo – as well as in editing. Getting the right color can give your photograph contrast, making it more eye-catching. Now, the basic thing you have to remember when editing for color is saturation and vibrance. You can, however, adjust individual colors too. While this may take longer, it does provide you with more control.
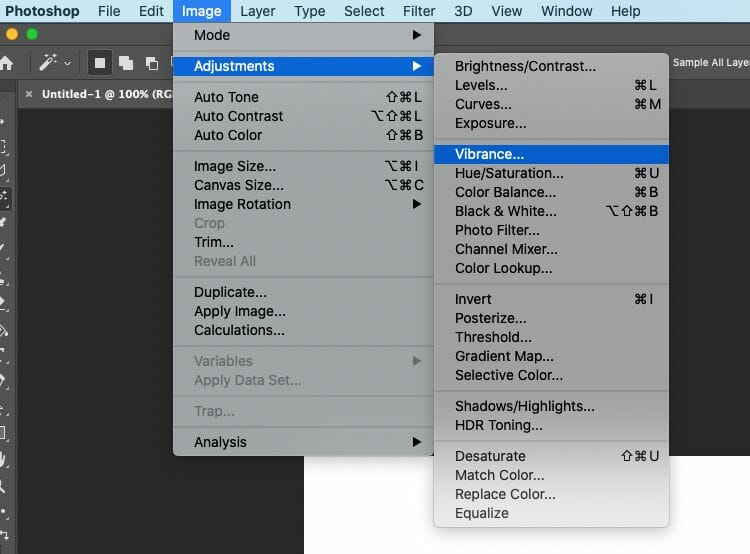
Adjusting saturation will show you how true a specific color is. For example, increasing the saturation will make the color red, red. If you lower it, this will look more like muted pink. And when you remove all the saturation, the colors will become gray.
RELATED: HOW TO IMPROVE COLOR WITH WHITE BALANCE
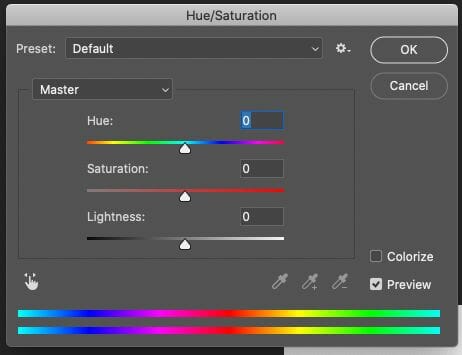
On the other hand, there’s the vibrance. Think of this as the smarter version of saturation. If you adjust this, the muted colors will be affected more than those that are already well-saturated.

2. How to remove unwanted elements in a photo?
Many photographers need to master this technique as there are certain elements and objects in the scene or background that they can’t remove physically. For example, there was a group of people at a distance who were suddenly caught in the frame, a telephone booth that doesn’t blend well with the whole image, or there’s an incredibly large zit on the forehead of your subject.
To remove unwanted elements, you can use a healing brush or clone stamp. The clone brush is a tool in Photoshop that allows you to replicate a portion of an image. To use it, you just have to select the area you want to make a copy of. From there, you can put it in the spot you want to replace. You can adjust the size of the brush, flow, opacity, shape, as well as blending modes.

Or, you can also use the healing brush. This tool allows you to clear blemishes, zits, scratches, and remove distractions. There are two types of healing brush and here’s their difference:
- Regular healing brush – allows you to choose your reference point
- Spot healing brush – doesn’t allow you to set a reference point. However, it can remove objects and certain elements based on the patterns and colors in the area. Compared to the clone stamp, this is an easier tool to use. However, it won’t give you as much control as with a clone stamp.
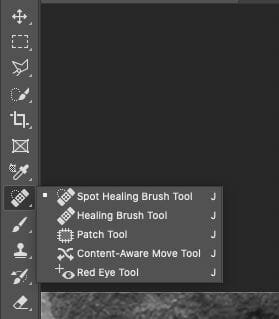
For smaller objects that you need to remove, the healing brush is enough. But for more complex and bigger elements, use the clone tool. Also, Photoshop conveniently allows you to open different images at the same time. So if you wish to copy a specific portion of one image and apply the same effects to a completely different photo, then you are free to do so. Again, just set the reference point and apply it to the other.
3. How to edit a photo more efficiently?
Layers are a photo editor’s best friend.
With adjustment layers, you can apply changes to certain parts of the image and not affect the whole picture. This way, when you make a mistake, you don’t have to hit the undo button and lose all your work. For example, you can create a “Hue and Saturation Layer”, adjust it, and move on to the next layer. When you have to edit it again, you can just go back and do so. Easy and non-destructive! To add a new layer, simply go to “Layer” and choose “New Adjustment Layer”.
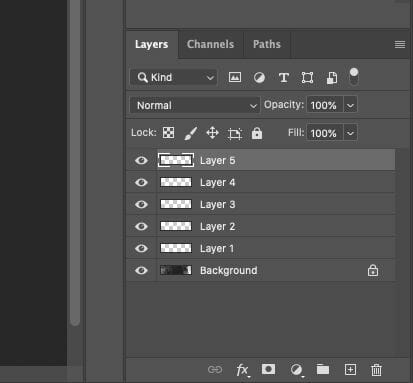
This technique is especially useful when you want to focus on a certain part of the picture. Layers allow you to burn, dodge, tone, and edit specific areas. For example, if you want fuller and redder lips for your subject, you can simply use a layer mask and paint the lips. Also, since certain body parts in a picture may appear to have different colors, you can create a “Hue and Saturation Layer” and simply mask out the area you want to apply the effects. This technique can also help you give the background a different tone.
4. How to edit peoples’ features faster?
Sometimes, it can be difficult to remove wrinkles or smooth out a portion of the image without affecting the tone. This is why you should learn about frequency separation. You can learn more details about frequency separation here.
Note that this is a technique that requires you to understand adjustment layers first before proceeding.
Frequency separation is a widely used technique to smooth out the skin. But other than on people, it also works well with backdrops, clothes, or anything you think needs to be evened out. This method allows you to separate the image’s textures and colors into different layers. And because they have their own layer, they are easier to adjust without affecting the other elements of the photo.

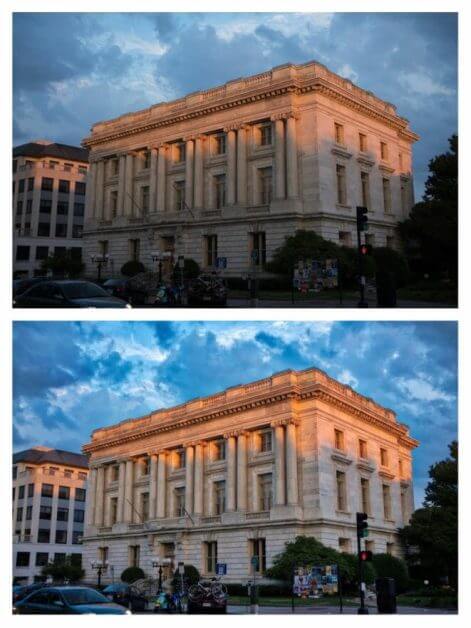
5. How to give photos a more professional and commercial finish?
Here’s a pretty easy trick that you’ll love doing with all your future photos!
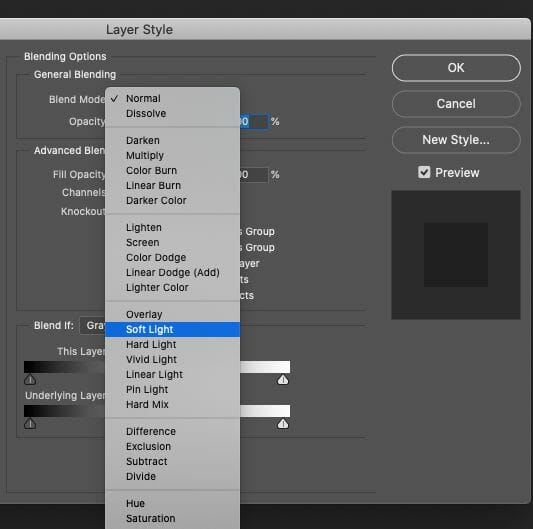
Just open a black and white layer in Photoshop and change the layer blending mode to “Soft Light”. This then gives you an image with too much contrast. Now, to dial it down, you need to drag the opacity and set it around 20 to 60%. And you’re done!
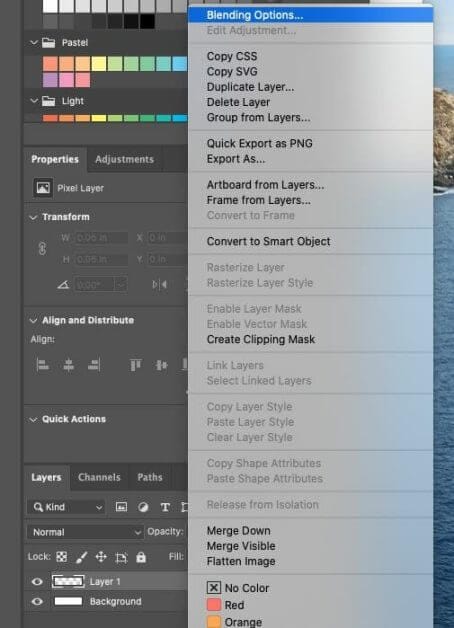
Follow the images below to see what I mean:
- Add a new black and white layer, then right click the layer to bring up the menu. Choose blending options.
- Then, under the layer style menu, find the blending mode. Choose soft light on the popup pull down menu.
- Adjust your opacity slider between 20-60%, depending on the look you want.

This will give your images a sharp commercial and professional look. But aside from that, the black and white layer allows you to control the luminance of every color. Just try playing around with the yellows and reds, and we can guarantee you’ll end up with some stunning skin tones for your subject.
Does Every Photo Need Editing?
While editing is certainly a fundamental part of achieving the best final image, it may not be required for some businesses related to photography. For instance, The Flipbook People is a company that captures the images from your event and turn them into that – a flipbook. Without editing, they print the photos, bind them together, and create a small book that serves as a party favor.
Another example of a business that doesn’t require any post-processing is Orlando Photo Booths. They set up the booth and all the needed equipment, and without editing, the photos will be given to the clients in an instant.
Finally, if you’re just snapping shots for yourself, the lack of any editing may be your endearing way of saving a memory.
Now, with all that said, you still have to remember that you can’t fix all your photography flaws. Editing is not some wand you use to magically turn a bad photo into a good one. Even with the amazing things that editing can do, there’s still no substitute for raw beautiful images.
Final Word
Photography doesn’t end with pressing a shutter. The images you collect on your memory stick/card will still need a bit of editing work. This is especially true if you’re professional trying to impress a client, or would like to grow your brand. If you’re a more casual photographer, perhaps as a hobby, having the right skills to edit your images is still important.
Who likes dark, badly exposed, or poor color (un)saturated images?
Nobody, really.
Let’s get this out of the way. Technology has come a long way. Online photo storage and sharing is cheap! Camera software algorithms make it super easy to capture spectacular images without a lot of work. A great camera with automatic settings only, and shooting in good ambient light will shortcut a lot of post-processing work. But, to underscore the importance of editing, there are billions of images captured everyday and they are all over the internet.
What makes your photography truly different?
There’s the trick: photo editing pushes those little pixels around and can add that pizzaz that separates you from your competition, or simple everyday expectations.
I use Photoshop, which is inexpensive with the adobe photography plan that bundles Photoshop with Lightroom. I’ve been using this photo editing software for years.
Check out my photo gallery!
Surprise people with your photography!
Look, I didn’t capture all the editing things you could do with your images. But, hopefully this article gives you a good start on the key 5 photo editing techniques you’ll want for making better pictures.

Tangible Day on YouTube (Miniatures and More!)

Appreciate the mention! I always feel like I have to edit every photo if I shoot the image in RAW as the files are just not processed at all. No contrast, no sharpness, etc. That’s why I stopped taking my camera to birthday parties, events, etc. That way you can just use your phone camera and upload as you go without worrying about adding more editing work.
Great blog! You have mentioned some great techniques. I hope many people have benefited by this. Thank you. Appreciate from Fast-Clipping-Path.
Thank you for the compliment!
Thanks for sharing this amazing photo editing technique with us. I am a learner of adobe illustrator. well explain I love to do exactly the same work by myself. I really appreciate it.
Blog is an awesome piece for basic level photo editing describing ins and outs with the easiest way. Thanks, team Tangible Day
Every time, i miss layer and for only that reason, lot of freepik Design got rejected. I really struggling with this, yes agree with you layer is the best friends for Graphic Designer. Thanks for sharing great piece of content, i read your other article also, those are so informative.
Every photo editing tool has some different method to editing any photos. Quality photo retouching service possible for expert photo editors. Thanks for sharing this amazing information. I really appreciate it.
Thanks for sharing this. I am glad to find this and it is very interesting.
Your photo editing technique are so goods. really i learn sonthings
Thanks For sharing this article. It is very informative for me.
There is so many photo editing technique. But most Editors use Top photo editing techniques as you mentioned in your post.
Thank you very much for sharing amazing content. I am a professional Graphic Designer and use Photoshop as my main photo editing software.
Very Effective Photo Editing Tutorial. I have always use Photoshop Because I Think Photoshop Is the Best Photo Editing Software.
Very Amazing Photo Editing Tutorial.
There are lots of photo editing tools in photoshop. Your mentioned editing technics are very important in photo editing world. It is a creative job. well writing.
Here the information you included is very important to match the area of focus, besides we will be very happy if you regular set up like this post. Thanks in advance!!
We are a leading company in the field of photo editing services, with a focus on providing expert clipping path and e-commerce photo editing solutions. Our dedicated team at UCP is committed to delivering affordable post-processing services for images, catering to esteemed brands, retailers, and renowned photo studios located across the United States, the United Kingdom, and Europe.
Your blog is like a comforting cup of tea on a rainy day.
This is an excellent post you have shared with us, and your article is also well done.