Are you wondering how to paint your 3D printed models? 3D printed miniatures look a lot better with a good paint job to bring out all those details. Painting 3D printed minis is the same process as painting other kit models and miniatures. But, there are a few places that require a little more thought and planning.
In this article, I show you how I paint a 3D printed Hydralisk model from the Starcraft Universe. I printed this model on a resin SLA printer (see process here).
You can purchase the STL for download and 3D print at Gambody.com. If you’re looking for free 3D printable miniatures and models for tabletop gaming, like roleplaying games, i.e., D&D, Pathfinder, and war games, check out Thingiverse.com.
11 Steps to Paint a 3D Printed Hydralisk
1. Prime the Model
I recommend Vallejo Surface primer as the first choice for painting 3D prints that don’t require a lot of sanding.

If you’re painting a large 3D printed model with visible build lines that require post-primer sanding, I’d suggest an automotive filler-primer spray, like this affordable one.
RELATED: TOP 10 PRIMERS FOR MINIATURES AND MODELS
I printed this Hydralisk with a resin 3D printer. See here for that process. The purpose of this model was for a project to create a Tyranid proxy model for the “Red Terror” (Games Workshop).

As a resin-printed miniature, the model required very little post-processing work.
To start, I used my airbrush, a Patriot 105, to apply the first primer coat. I thinned the Vallejo Surface primer with 2 drops of water to 10 drops of primer.
The Patriot 105 I use has a 0.4mm nozzle that works great for priming and base coating large surfaces.

For this project, I attached the airbrush to my trusty Aspire Pro compressor with air tank and covered the entire Hydralisk in a single thin primer coat.
2. Apply “Black” Paint Base Coat (Prepare for Zenithal Highlighting)
This step is easy.
All you have to do is coat the model in black paint. A nice even coat of black paint, and the model is ready for zenithal highlighting (below).
For this model, I used the Badger airbrush to spray Vallejo model air black.


3. Airbrush “zenithal” highlights with white paint
Zenith – the point in the sky or celestial sphere directly above an observer.
Source
Zenithal highlighting is the miniature painting technique of applying highlights from a point directly above the model.
You can perform zenithal highlighting two ways:
- Airbrush – With an airbrush, spraying white or other bright-colored paint from directly overhead of your model
- Spray can – With a spray can primer (or paint) that is white or brighter in color than your first dark layer; apply the highlight from overhead of your model
Owning an airbrush is a tad more costly than simply relying on spray can paints or primers for zenithal highlighting. But, an airbrush gives you choices and flexibility.
Not to mention, you an easily airbrush indoors if you’re careful.
Spraying aerosols requires really good ventilation. Most hobbyists don’t own the proper fume hoods or spray booths that can safely filter out the volatile chemicals from spray can paints and primers.

To apply zenithal highlighting, take your airbrush (or spray can) and directly spray your model from directly above.
Pretend your spray is a light source from directly above the model.
Light that model up!


Zenithal highlighting is great for the painter who needs a general high-contrast starting point to work from.
In fact, underpainting in black and white before adding glazes of color is a traditional canvas painting approach.
4. Glaze with the first main color (I chose red)
I chose red as the main color of this 3D printed model.
MORE: HOW TO DECIDE A COLOR SCHEME FOR YOUR MINIATURES AND MODELS
I wanted this model to stand out from the background. A hydralisk is a vicious creature that demands attention. Red is the color for “alert, awake”.

Of my paint collection, the easiest bright red paint to apply as a glaze (that isn’t pre-made as a glaze), is Vallejo Model Air Fire Red. The paint has a great pigment consistency that is thinned perfectly for airbrushing.
You can use any paint as a glaze with an airbrush. Another miniature artist who uses an airbrush to apply glazes is Sergio Calvo. Glazing is a powerful technique. Apply glazes to subtly change the underlying color on your models!
To turn this normally opaque paint into a glaze, however, I did have to add a little glazing medium. To thin the mixture to make it easier to airbrush, I thinned out the paint-glaze with a few drops of Vallejo airbrush thinner.
You can try this mixture for thinning paints for glaze airbrushing:
- 3 parts paint
- 1 part glaze medium
- 1 part airbrush thinner (or flow aid)
- 1 part water
The general guideline I use for thinning paints and media for airbrushing is to make it behave like “whole cow’s milk”. Cow’s milk runs along the side of a cup a tad less quickly than pure water. It also has a look to it that is not quite opaque, but not clear either.
How to Apply a Glaze
To apply the red paint-glaze, I set my airbrush pressure to about 20-25 PSI and sprayed a thin coat over the zenithal highlight areas. The bright white paint makes the paint pop off the rest of the model.
The black under-paint stays in shadow. Glazing over the black areas a little won’t brighten them up since the paint spray is kind of transparent.

Keep spraying colors over the model until you’re happy that you’ve shifted the majority of the white under-paint to the desired color. Try and keep the black shadow areas darker by avoiding too much color application.
Simply put, start your color application in the same way you applied the zenithal highlights: from above.
Then, add color to the sides to glaze the other white under painted surfaces.

Glazing with an airbrush over a zenithal highlighted model is especially useful for 3D printed subjects. This is because spraying avoids some of the problems of regular brush work over an uneven surface (3D print layers and lines).
The artifact 3D print lines that come from the printing process (even high resolution prints like this SLA resin printed model) can really make normal brush blending and glazing difficult.
Paint simply does not behave well on 3D printed models.
Airbrushing solves all the guesswork of painting 3D printed surfaces.
5. Brush on the secondary colors
From here, I put the airbrush aside.
If you were more patient than I am, you could continue painting with the airbrush by masking off previously painted areas. You could do this with painting masking tape or my preferred liquid frisket.
Liquid frisket is essentially a brush-on stencil. After you’re done painting over it, liquid frisket is peeled off.
I don’t use liquid frisket here, because applying liquid frisket is not great at masking off larger surfaces (like those I would have to block on this model).
Instead, I go to the traditional brush and paint approach.
I choose a matte black for the base color of the main carapace of the hydralisk. For this black I used Scale 75 Flat Black.

I apply the black paint in 1-2 layers along the center carapace plates.
(I didn’t take the photo of the model here; see below in the next step how the black looks).
6. Add more interest with another “blend” color
I wanted to add more interest to the red and the black I painted so far.
To do this, I chose a “blend” color.
For me, this means a color that isn’t going to detract from the red brightness, or the black darkness. I’m looking for a color that is in between bright and dark.
A twilight color.
I chose dark purple. In this case, Monarch Purple from my collection of Master Reaper Series paints.
Until Scale 75 came along, Master Reaper paints were my favorite brand of model paints. I have literally hundreds of bottles of Reaper Paints (probably spent a a few hundred $ USD on model paints from Reaper).
Although Vallejo paints are more versatile across many types of miniatures, Reaper makes the best paints for blending, airbrushing, and in my opinion easily allow for more advanced painting techniques. Check out their core paint set.

I thinned a few drops of the Monarch purple with Vallejo airbrush thinner.
Then, I sprayed that “twilight zone” between the black and red paint.
See the photo below.

7. Bring in the flesh tones
I like to keep most organic models feeling “organic”. What better way to keep things fleshy and alive, but with a flesh tone colored paint.
RELATED: CHECK OUT ANOTHER AMAZING ORGANIC MODEL PAINT JOB
Going back to my Scale 75 brand paint collection, I pull out Ishtar Pink. This is a paint from the Scale 75 Fantasy & Games paint line, which is formulated for gaming miniatures.
(I own so many miniature and model paints!)
According to various internet sources, Scale 75 Fantasy & Games paint are more resilient to the bumps and bruises of gameplay.
So, it’s a great paint for board game models, for example.

I use a regular brush to apply a thin color of Ishtar Pink along the parts of the model I think should be “flesh” (as opposed to armor carapace or bone material).
The parts of an organic model that “moves” or “undulates” generally require tissue that is flexible. Changes in tissue material indicates to me a difference in color and texture.
Hence, I chose certain elements to have this brighter flesh tone.

8. Dry brush new highlights (a second under paint)
I want to add new colors to the black carapace.
The best way to do this is to create a high contrast under painting. See this article for how to dry brush.
The easiest way to add high contrast to a dark colored base (without using an airbrush) is to first dry brush a bright neutral color.
Like gray.

I don’t have a ton of patience sometimes. I’m always looking for shortcuts that won’t sacrifice quality of the final result.
Dry brush is great because it gives you control over where to apply paint pigments without having them spill over into areas you don’t want them too.
Also, dry brushing is easy for pulling out details, because it targets raised areas of model, which protects the shadows. The dry brush approach is essentially an inverted “wash”.
You can read about my use of washes here.

The best dry brushes are made by Citadel. You can get away with cheaper brushes, such as synthetic cosmetic brushes. But, as a commissioned painter, I need reliability and consistency.
Although I’m not keen on Citadel’s pointed round brushes, I love their dry brushes and base coat brushes.

I don’t go into detail about how to dry brush here.
For the black carapace, I dry brushed the Citadel Longbeard Grey color. This ended up providing a nice foundation for adding color in the next step.
9. Apply accent color for the black carapace
I chose Master Reaper series “Marine Teal” as my final accent color for the model.
The color adds a “cool” tone to model that is primarily “warm” (most of the Hydralisk is red).

Color contrast is important for adding and maintaining viewer interest on any miniature.
Notice how the main saturated colors I used on the 3D printed Hydralisk cover the spectrum of the color wheel. Here are ways to think about color.

The kinds of paint choices I made add color contrast through temperature (warm vs. cool).
For your models, consider how different colors work together. Even though you may want most of your model blue, for example, think about how you can add some warmth (maybe orange, yellow, or red).
I don’t go into detail about how I painted these colors over the black carapace. For the most part, the next few photos speak for themselves.
The technique at this point is essentially a dry brush, followed by glazing to provide the Marine Teal color.


10. Paint other small details, like bone and highlighted flesh.
For a great tutorial on how to paint bone, check this site. Using some simple bone-painting techniques I finished off the claws and the spikes on the sides of the Hydralisk.
Briefly, I used a basecoat of Ivory colored paint, followed by a Citadel Agrax Earthshade wash, then a highlight of the same ivory colored paint.

To highlight the flesh, I mixed the Ishtar Pink paint (from step #7) with the ivory colored paint I used for the bone.
I paint layered up the raised flesh surfaces with this brighter pink mixture. Then, using Citadel Agrax Earthshade (see a pattern?) I washed these flesh areas.
To really make the flesh pop off the model, I highlighted using the same pink-ivory mixture.
11. Varnish the model
I varnished the entire model to even out the reflective surfaces (for best results, see how I recommend using matte varnishes).
This made the model easier to photograph.
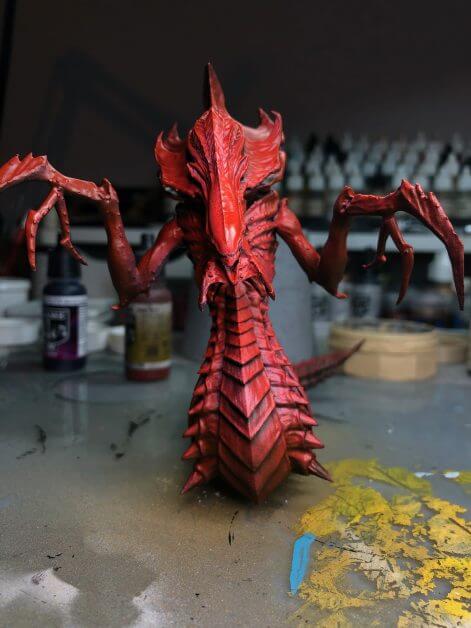
A photogenic Hydralisk!
The final result is ready for studio photography and display.


Summary
3D printing is awesome! Paint up the models and you can really make an impression with your work.
Of course, painting 3D printed miniatures has unique challenges. I’m glad I had the opportunity to share with you some of the tips and tricks I used to paint this 3D printed Hydralisk.
If you’re looking to 3D print this model yourself, you can purchase this at Gambody.com.
This post is not sponsored by Gamebody. I purchased this model for my private collection.
Who loves Starcraft?

Tangible Day on YouTube (Miniatures and More!)

Shut up and take my money!
Thank you for sharing the process of this great model
Sure thing!